Fun in Deep Learning Project
In this post, we will create a project, a text recognizer application. Here we will detail all the process that takes place in creating a deep learning project and various practices. We will also look at an amazing case-study done at Dropbox, Creating a Modern OCR Pipeline Using Computer Vision and Deep Learning. This case-study takes us behind the scenes on how the team at Dropbox built a state-of-the-art Optical Character Recognition (OCR) pipeline.
This post will be updated multiple times as we will deal with a lot of experiments spanning multiple weeks.
All the codes safely stored in github repo TextRecognizer
All codes can be run on Google Colab (link provided in notebook).
All the results of experiments can be tracked and reproduced using comet.ml.
Hey yo, but how?
Well sit tight and buckle up. I will go through everything in-detail.
Feel free to jump anywhere,
Full Stack Deep Learning Bootcamp provides an excellent guide on many different questions keeping up DL practitioner such as, “How to start with ML Projects?”, “What steps are involved?” As the graphics below describes, this course was about practices in creating production-ready projects.
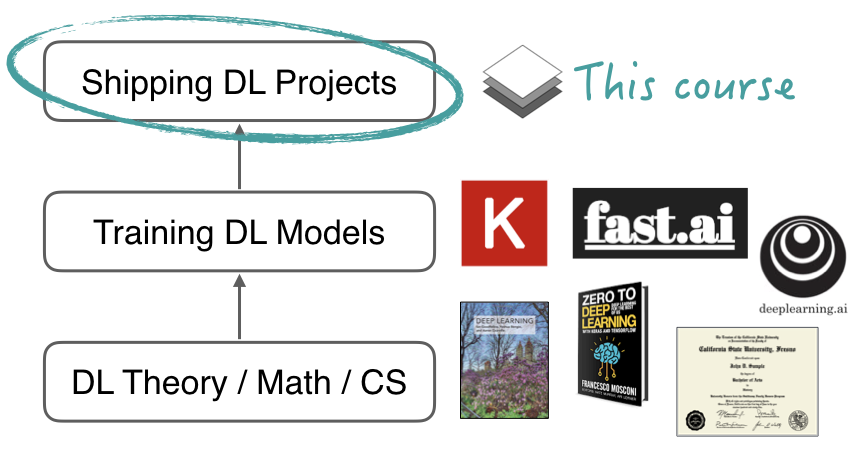
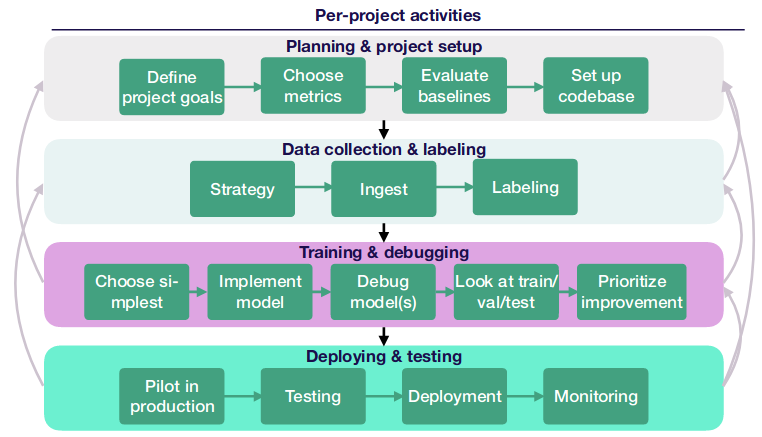
We will steal some of the slides from the lectures that serve as an excellent to-do’s as a starting point of any DL project. We will apply all these ideas and answer all the questions in context of our project.
Steps in DL Project
We start with outlining these steps that are performed for every project in Deep Learning.
- Planning & Project Setup
- Data collection & Labelling
- Training & Debugging
- Deploying & Testing

- Planning & Project setup
In this first step, we lay out what are the goals of the project. We determine what the requirement the project needs and make sure have enough resources allocated for the project.
- Data collection & labelling
Here comes the most critical step, we look for different ways in which we can collect appropriate data for our project and look for cheap ways to label the data. Here we focus on the questions, How hard is to get data?, How expensive is data labelling? or How much data will be needed?
- Training & Debugging
In this step, we start with implementing baselines. We look for any SoTA models and reproduce those. All we need is to make our model more robust and effective. We also look at what metric do we care about and decide which metric to the model optimize for.
- Deploying & Testing
In last step, we write test functions to test out the model in some version control (not after deploying in real-world but before) to check the robustness of the model and once happy with the results we are ready to deploy.
Notice the flow is not linear or sequential, there is a lot of backtracking and improving as we improve our beliefs about the project. One example could be that having decided goal and collected data, we moved on to training step but once there we realize that our labels are unreliable or realize that goal is too hard and thus we backtrack to second or first step from third step. We keep updating different steps as new information keeps popping up everytime.
Dropbox Case Study
Here I will take you through the journey of how the team at Dropbox built and deployed a state-of-the-art OCR pipeline to millions of users.
- Planning & Project setup
The goal of the project was to enable following features for Dropbox Business users
- Extract all the text in scanned documents and index it, so that it can be searched for later
- Create a hidden overlay so text can be copied and pasted from the scans saved as PDFs
The first version used a commerical off-the-shelf OCR Library before creating own machine-learning OCR system. Once they confirmed that there was indeed strong user demand for the mobile document scanner and OCR, they decided to build our own in-house OCR system.
Another aspect of encourage the project was cost consideration. Having own OCR system would save them significant money as the licensed commercial OCR SDK charged them based on the number of scans.
- Data collection & labelling
To collect data, they asked a small percentage of users whether they would donate some of their image files to improve OCR algorithms. The most important factor taken into consideration at Dropbox was privacy. The donated files were kept private and secure by not keeping donated data on local machines in permanent storage, maintaining extensive auditing, requiring strong authentication to access any of it, and more.
Next step was how to label this user-donated data. One way is to use platform such as Amazon’s Mechanical Turk (MTurk) but the dataset would be exposed in the wild to workers. To navigate this challenge, the team created their own platform for data annotation, named DropTurk. They hired contractors under a strict non-disclosure agreement (NDA) to ensure that they cannot keep or share any of the data they label. Here is an example of DropTurk UI for adding ground truth for word images.
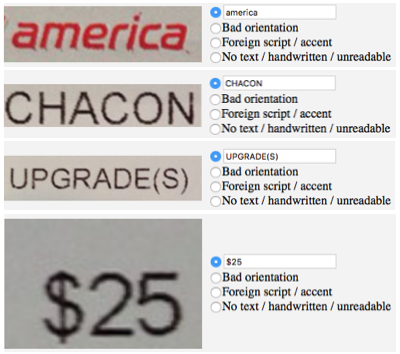
Using this platform, the team collected both word-level dataset, which has images of individual words and their annotated text, as well as a full document-level dataset, which has images of full documents (like receipts) and fully transcribed text.
- Training & Debugging
Start with simple network and simple version of the goal. The team at Dropbox started with simple goal to turning an image of a single word into text. To train this network, they needed data. Back to previous step, they decided to use synthetic data. To gather synthetic data, they created a pipeline of 3 pieces, first a corpus of words to use, second a collection of fonts for drawing the words and third a set of geometric and photometric transformations meant to simulate real world distortions.
Here is a sample of synthetic dataset for generating word images,

The team started with with words coming from a collection of Project Gutenberg books from the 19th century, about a thousand fonts they collected, and some simple distortions like rotations, underlines, and blurs. They generated about a million synthetic words, trained a deep net, and then tested the accuracy, which was around 79%.
Here are some highlights which the team provides to improve the recognition accuracy.
- The network didn’t perform well on receipts, so word corpus was expanded to add Uniform Product Code (UPC) database.
- The network was struggling with letters with disconnected segments. Receipts are often printed with thermal fonts that have stippled, disconnected, or ink smudged letters, but the network had only been given training data with smooth continuous fonts (like from a laser printer) or lightly bit-mapped characters. To overcome this, they included words on thermal printer fonts to get same effect as the characters appear on any receipt.
- The team did research on top 50 fonts in the world and created a font frequency system that allowed them to sample from common fonts (such as Helvetica or Times New Roman) more frequently, while still retaining a long tail of rare fonts (such as some ornate logo fonts). They discovered that some fonts have incorrect symbols or limited support, resulting in just squares, or their lower or upper case letters are mismatched and thus incorrect. By manually going through all 2000 fonts, they marked the fonts that had invalid symbols.
- From a histogram of the synthetically generated words, the team discovered that many symbols were underrepresented, such as / or &. They artifically boosted the frequency of these in the synthetic corpus, by synthetically generating representative dates, prices, URLs, etc.
- They added a large number of visual transformations, such as warping, fake shadows, and fake creases, and much more.
Next, step they divided OCR problem into two steps : First, they would use computer vision to take an image of a document and segment it into lines and words; which they called the Word Detector. Then, they would take each word and feed it into a deep net to turn the word image into actual text; which they called the Word Deep Net.
Word Detector did not use a deep net-based approach. They used a classic computer vision approach named Maximally Stable Extremal Regions (MSERs), using OpenCV’s implementation. The MSER algorithm finds connected regions at different thresholds, or levels, of the image. Essentially, they detect blobs in images, and are thus particularly good for text. Word Detector first detects MSER features in an image, then strings these together into word and line detections.
The team tracked everything needed for machine learning reproducibility, such as a unique git hash for the code that was used, pointers to S3 with generated data sets and results, evaluation results, graphs, a high-level description of the goal of that experiment, and more. Week over week, they tracked how well they were doing. The team divided the dataset into different categories, such as register_tapes (receipts), screenshots, scanned_docs, etc., and computed accuracies both individually for each category and overall across all data. For example, the entry below shows early work in the lab notebook for first full end-to-end test, with a real Word Detector coupled to our real Word Deep Net.
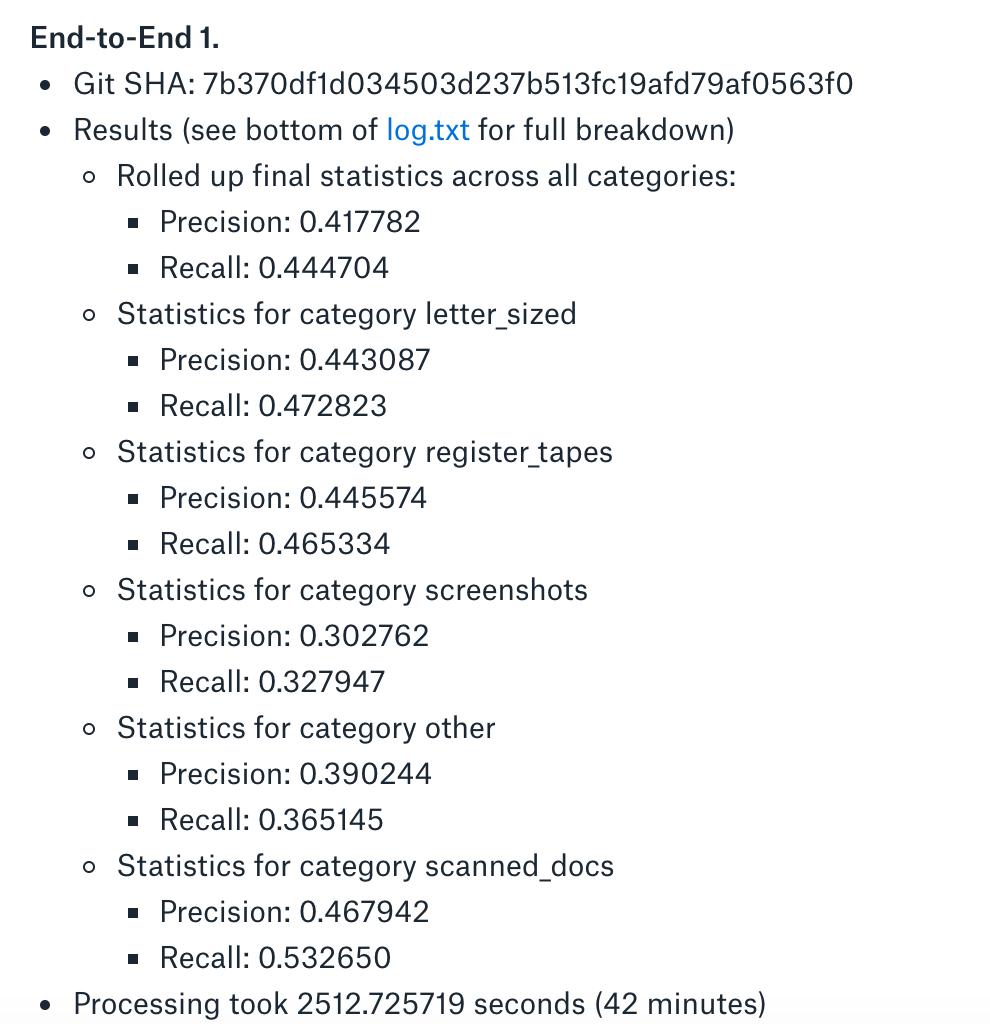
Synthetic data pipeline was resulting in a Single Word Accuracy (SWA) percentage in the high-80s on their OCR benchmark set. The team then collected about 20,000 real images of words (compared to 1 million synthetically generated words) and used these to fine tune the Word Deep Net. This took them to an SWA in the mid-90s.
Next, and final network was to chain together Word Detector and Word Deep Net and benchmark the entire combined system end-to-end against document-level images rather than older Single Word Accuracy benchmarking suite. This gave an end-to-end accuracy of 44%. The primary issues were spacing and spurious garbage text from noise in the image. Sometimes the system would incorrectly combine two words, such as “helloworld”, or incorrectly fragment a single word, such as “wo rld”. The solution to this problem was to modify the Connectionist Temporal Classification (CTC) layer of the network to also give us a confidence score in addition to the predicted text. They then use this confidence score to bucket predictions in three ways:
- If the confidence was high, we kept the prediction as is.
- If the confidence was low, we simply filtered them out, making a bet that these were noise predictions.
- If the confidence was somewhere in the middle, we then ran it through a lexicon generated from the Oxford English Dictionary, applying different transformations between and within word prediction boxes, attempting to combine words or split them in various ways to see if they were in the lexicon.
The team created a module called Wordinator, which gives discrete bounding boxes for each individual OCRed word. This results in individual word coordinates along with their OCRed text. Here is a sample output after passing through Wordinator.

The Wordinator will break some of these boxes into individual word coordinate boxes, such as “of” and “Engineering”, which are currently part of the same box.
Now that the team had a fully working end-to-end system, they generated more than ten million synthetic words and trained the neural net for a very large number of iterations to squeeze out as much accuracy as they could. All of this gave them all the metrics that exceeded the OCR state-of-the-art.
The final end-to-end system was ready to be depolyed.
- Deploying & Testing
Team needed to create a distributed pipeline suitable for use by millions of users and a system replacing their prototype scripts. In addition, they had to do this without disrupting the existing OCR system using the commercial off the shelf SDK
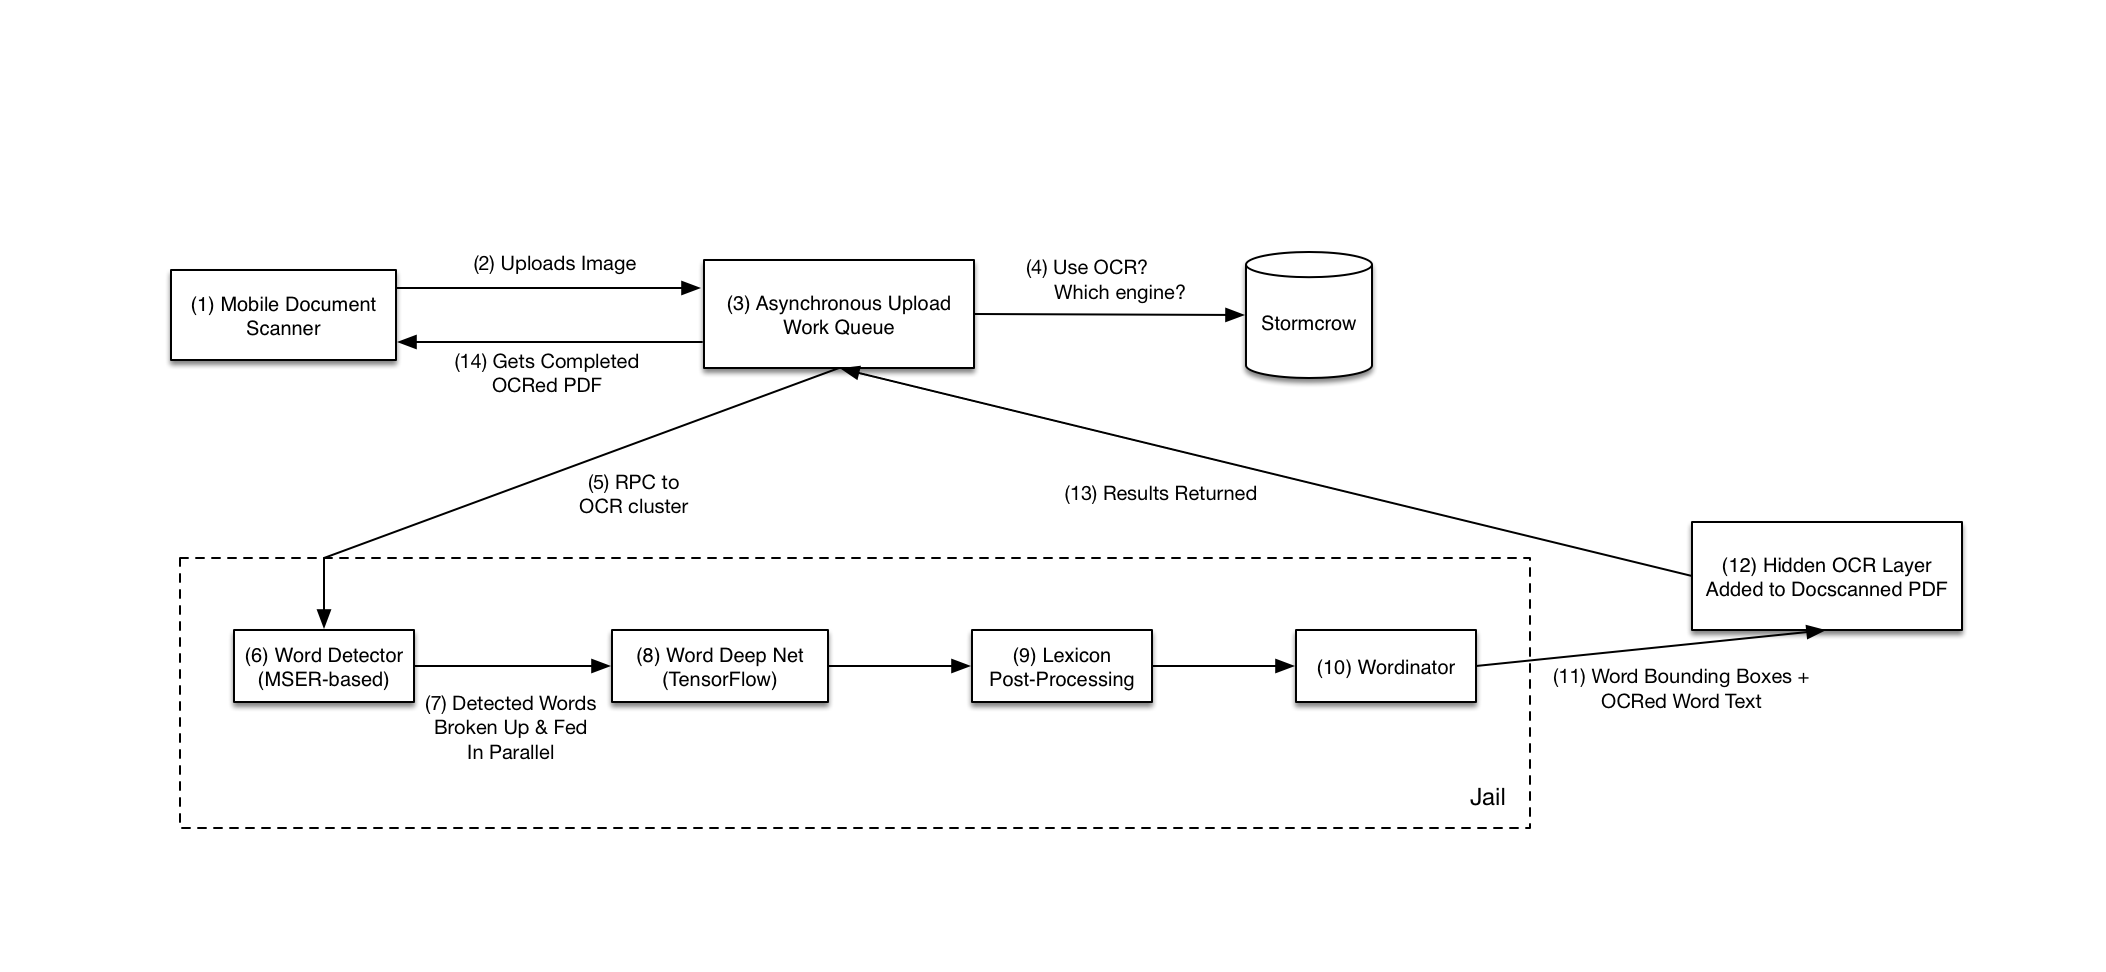
In the pipeline shown above, mobile clients upload scanned document images to the in-house asynchronous work queue. When the upload is finished, it then sends the image via a Remote Procedure Call (RPC) to a cluster of servers running the OCR service. The actual OCR service uses OpenCV and TensorFlow, both written in C++ and with complicated library dependencies; so security exploits are a real concern. The team has isolated the actual OCR portion into jails using technologies like LXC, CGroups, Linux Namespaces, and Seccomp to provide isolation and syscall whitelisting, using IPCs to talk into and out of the isolated container. If someone compromises the jail they will still be completely separated from the rest of the system.
Once we get word bounding boxes and their OCRed text, we merge them back into the original PDF produced by the mobile document scanner as an OCR hidden layer. The user thus gets a PDF that has both the scanned image and the detected text. The OCRed text is also added to Dropbox’s search index. The user can now highlight and copy-paste text from the PDF, with the highlights going in the correct place due to our hidden word box coordinates. They can also search for the scanned PDF via its OCRed text on Dropbox.
The team now had an actual engineering pipeline (with unit tests and continual integration!), but still had performance issues. The first question was whether to would use CPUs or GPUs in production at inference time. The team did an extensive analysis of how Word Detector and Word Deep Net performed on CPUs vs GPUs, assuming full use of all cores on each CPU and the characteristics of the CPU. After much analysis, they decided that they could hit their performance targets on just CPUs at similar or lower costs than with GPU machines. After that, did some rewriting of libraries to make use of all CPU cores.
Having everything in place running silently in production side-by-side with the commercial OCR system, the team needed to confirm that our system was truly better, as measured on real user data. The team performed a qualitative blackbox test of both OCR systems end-to-end on the user-donated images and found that they indeed performed the same or better than the older commercial OCR SDK, allowing them to ramp up our system to 100% of Dropbox Business users.
This entire round of took about 8 months, at the end of which the team had built and deployed a state-of-the-art OCR pipeline to millions of users using modern computer vision and deep neural network techniques.
Our Application
Here is image that gives an overview of flow and different components for our application.
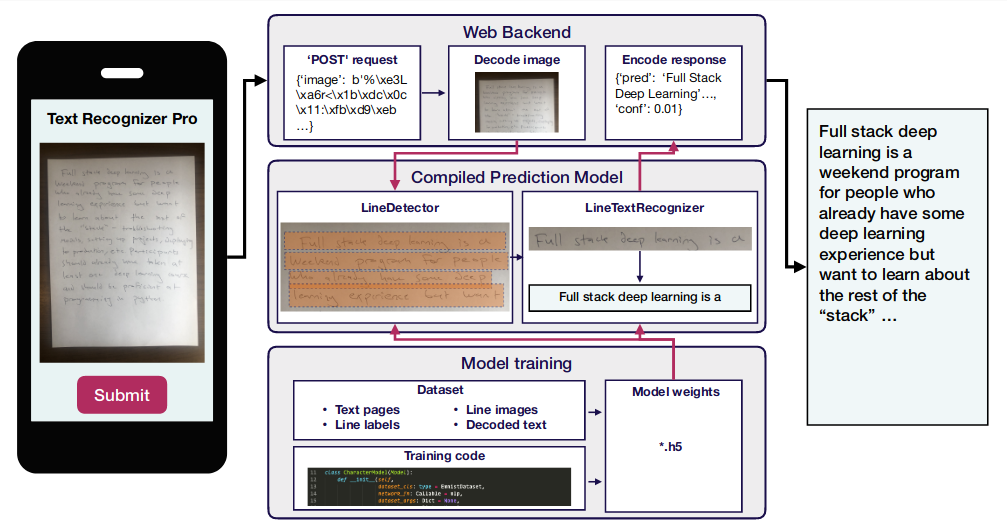
We have divided the task of recognition into two pieces : Line detector and Line Text Recognizer.
Experiment-1
The goal of this experiment will be simple which is to solve a simplified version of line text recognition problem, a character recognizer.
The dataset we will be using for this task will be EMNIST, which thanks Cohen and et al it is labelled.
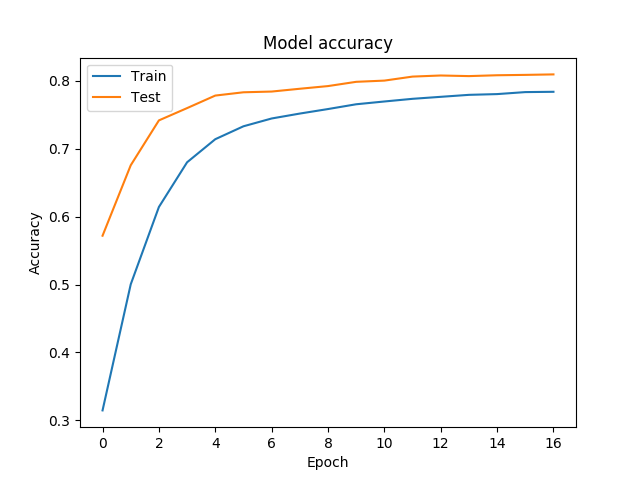
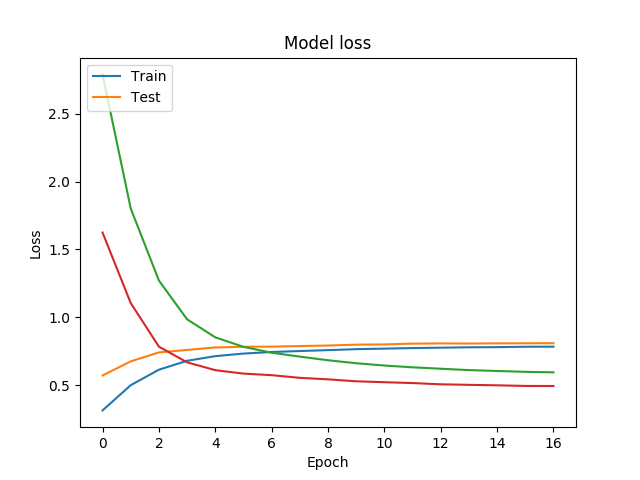
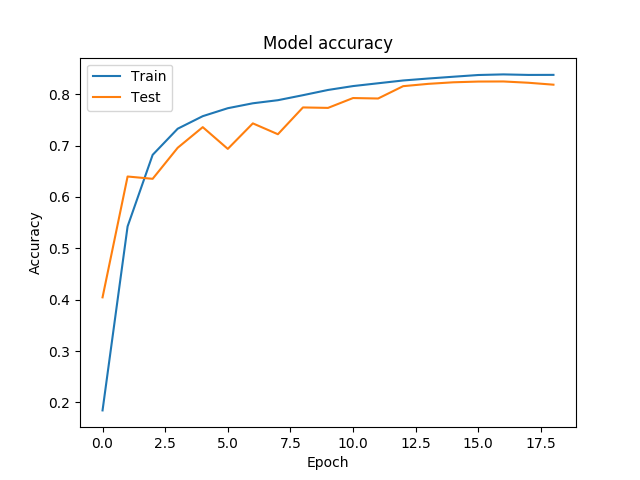
Here we experimented with 3 different architecture lenet, resnet and a custom CNN architecture.
Results
- Lenet
- Resnet
- Custom
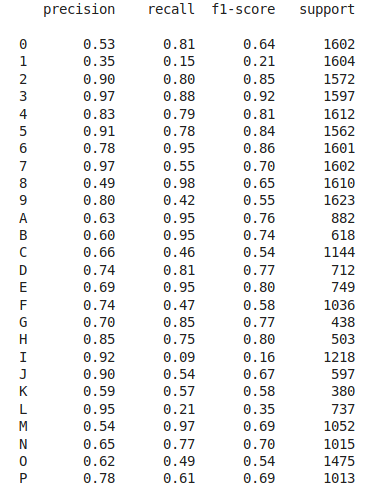
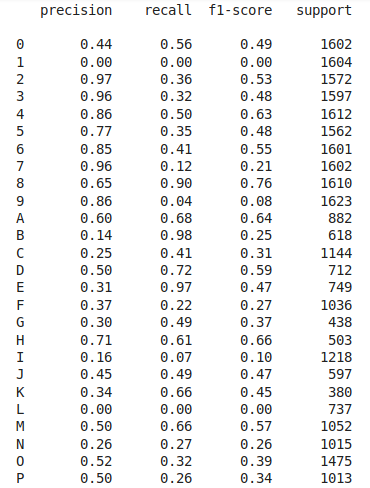
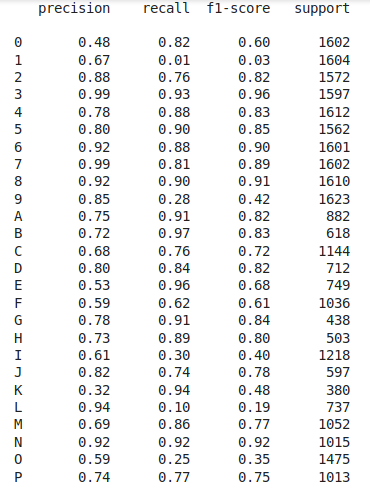
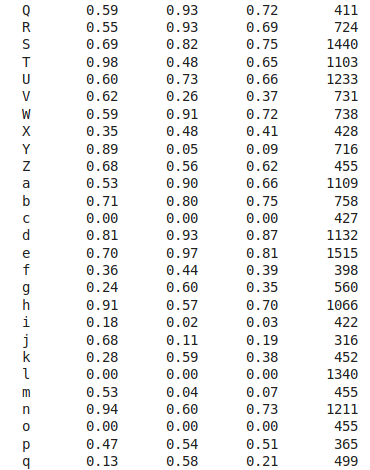
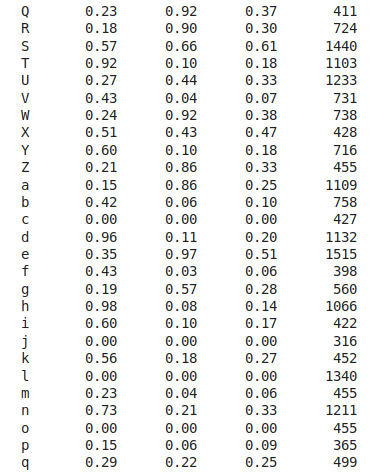
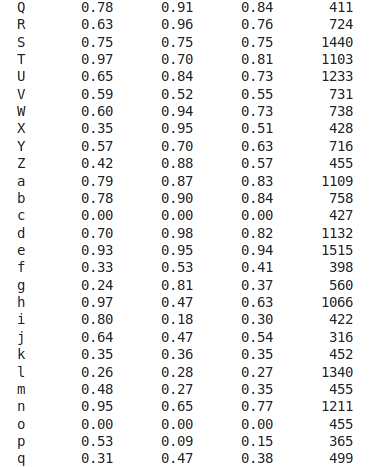
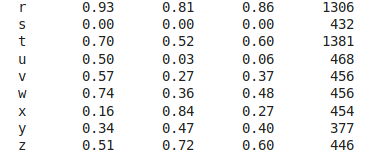
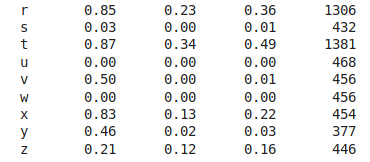
- Evaluation on Test dataset
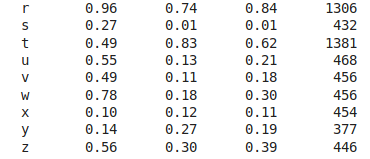
Breakdown of classification for test dataset using above 3 architectures.


Learnings
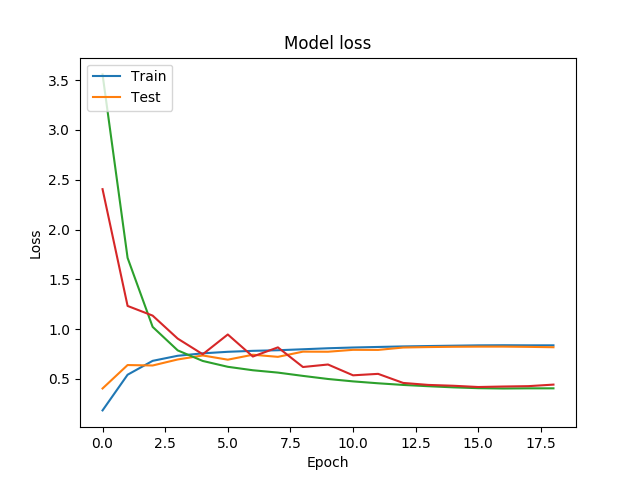
- Initially we trained all models with a constant learning rate.
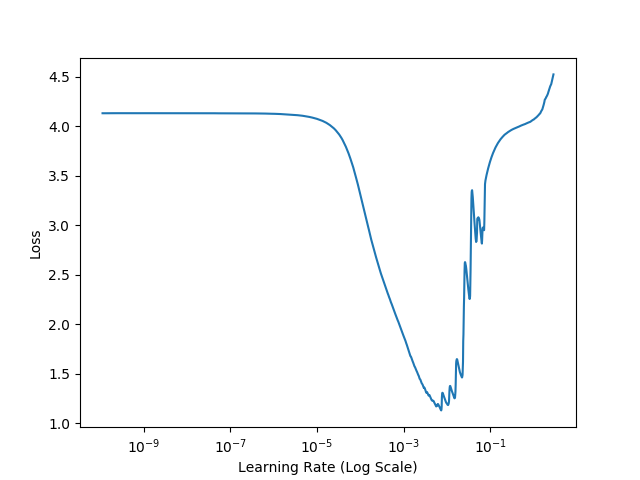
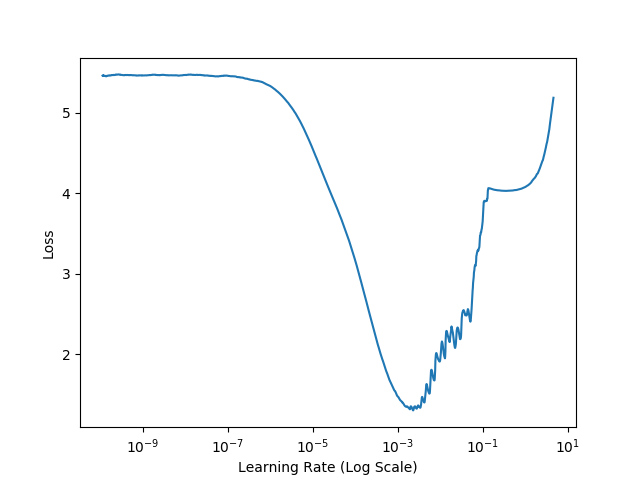
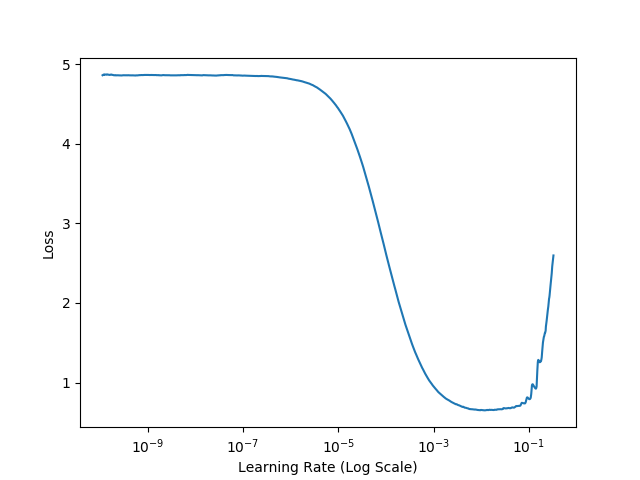
- Instead of using constant learning rate, we implemented cyclic learning rate and learning rate finder which provided a great boost in terms of both speed and accuracy for performing various experiments.
- Transfer learning with resnet-18 performed poorly.
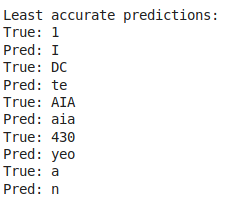
- From above results of test evaluation, we can see that model performs poorly on specific characters as there can be confusion due to similarity like digit 1 and letter l, digit 0 and letter o or O, digit 5 and letter s or S or digit 9 and letter q or Q.
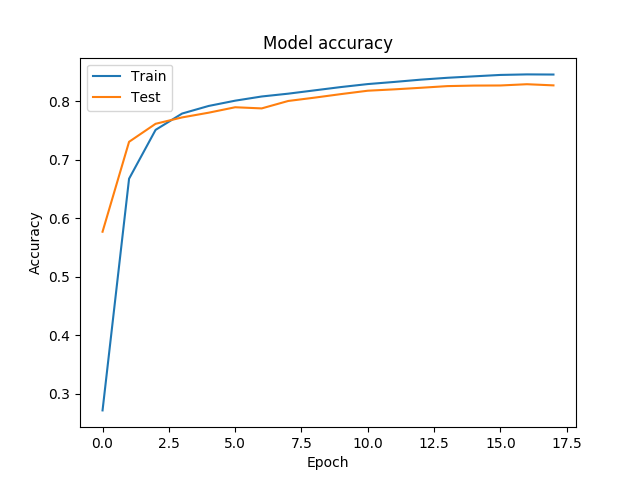
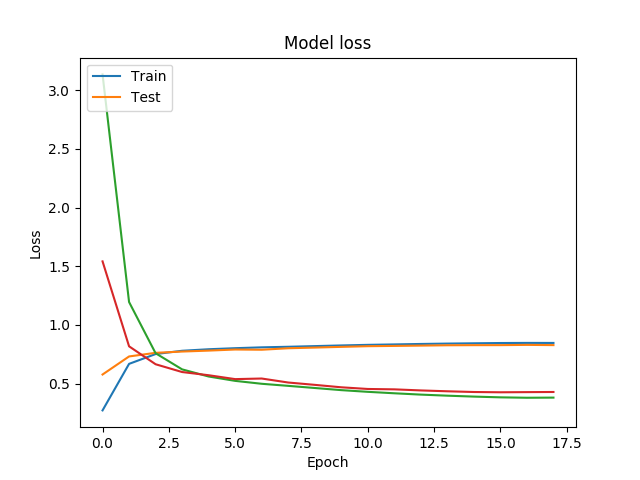
- Accuracies on train dataset are 78% on lenet, 83% on resnet and 84% on custom.
- Accuracies on val dataset are 80% on lenet, 81% on resnet and 82% on custom.
- Accuracies on test dataset are 62% on lenet, 36% on resnet and 66% on custom.
- Custom architecture performs well but resnet perform poorly (Why?)
- There is a lot of gap in train-val and test even when val distribution is same as test distribution i.e. val set is taken from 10% of test set.
- Look for new ways to increase accuracy
Experiment-2
Next, we will build a Line Text Recognizer. Given a image of line of words, the task will be to output what characters are present in the line.
We will use sliding window of CNN and LSTM along with CTC loss function.
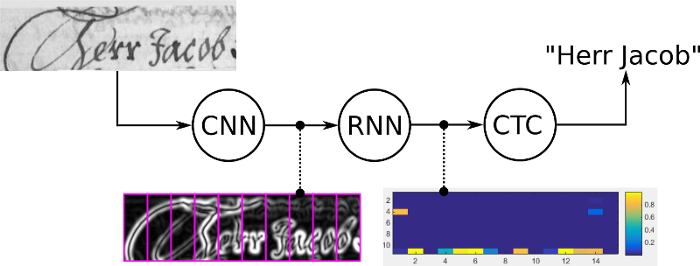
For this we will use a synthetic dataset by constructing sentences using EMNIST dataset and also use IAM dataset for training.
We first constructed EMNIST Lines dataset. To construct this dataset we used characters from EMNIST dataset and text from brown corpus from nltk. We fixed the number of characters in each line to be 34. The new shape of image in the dataset will be (28, 28*34). The image below show some sample examples from EMNIST lines dataset.
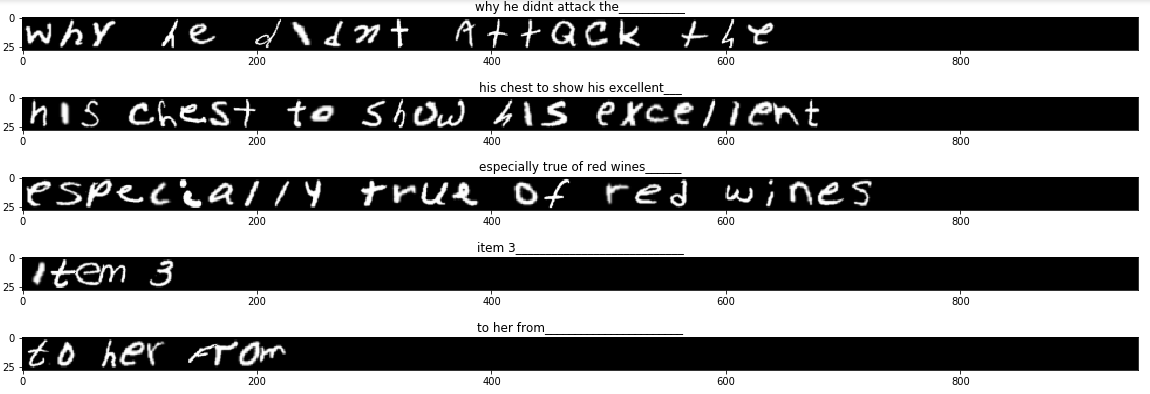
We started with simplest model i.e. to use only CNN to predict the characters in the lines. We tried using 3 different architectures same as above lenet, resent and custom. We achieved character accuracy of 1%, 0.017% and 3.6%.
- Lenet CNN

- Resnet CNN

- Custom CNN

Next, building a complex model. We created a CNN-LSTM model with CTC loss with 3 different CNN architectures like lenet, resnet and custom as backbone. The results were remarkable. We achieved an character accuracy of 95% with lenet and 96% with custom architecture.
- Lenet and Custom LSTM-CTC Model
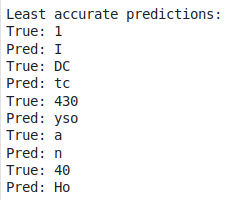
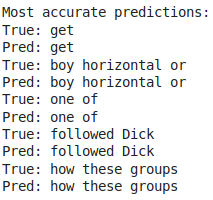
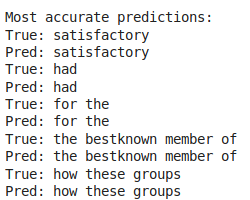
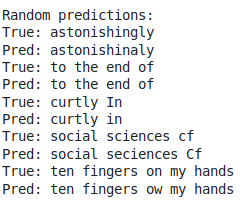
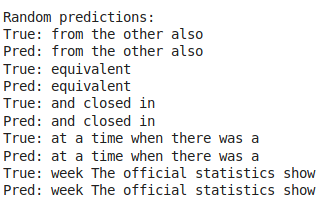
- Lenet LSTM-CTC Model

- Custom LSTM-CTC Model

Now we tried the same model with just changing the dataset. We replaced EMNIST Lines with IAM Lines dataset.

And the results.
- Lenet and Custom LSTM-CTC Model
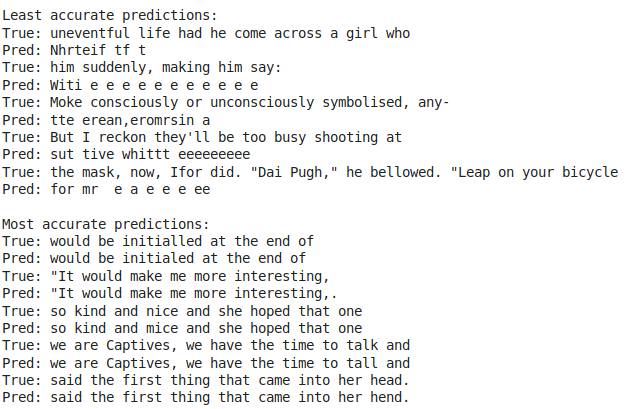
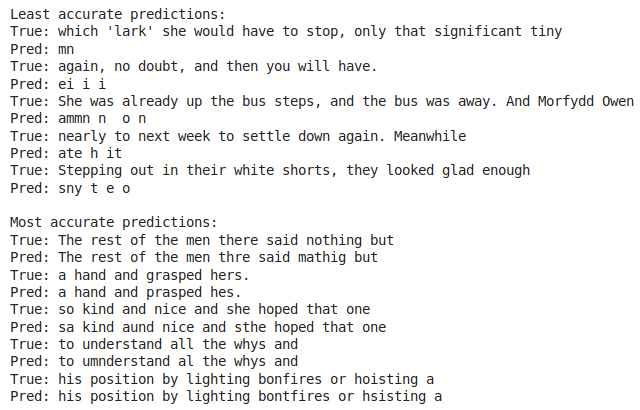
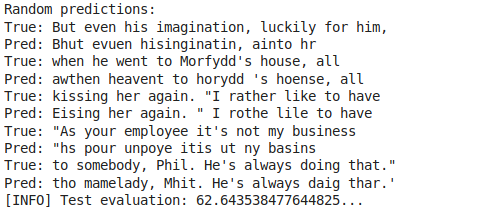

- Lenet LSTM-CTC Model

- Custom LSTM-CTC Model

Learnings
- Switching datasets worked but still requires a lot of time to train for further fine prediction i.e train more.
- LSTM involves a lot many experiments use bidirectional or not, use gru or lstm. Trying different combinations might help get even better results for each CNN architecture.
- Further, we can make use of attention-based model and use language models which will make model more robust.
- Using beam search decoding for CTC Models
Experiment-3
Almost done! We have completed Line Text predictor. Now comes the part of implementing Line Detector. For this, we will use IAM dataset again but paragraph dataset. Here is a sample image from paragraph dataset.
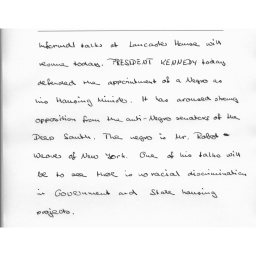
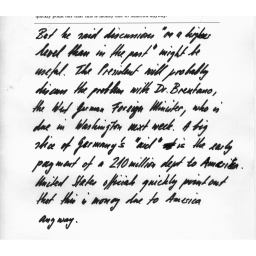
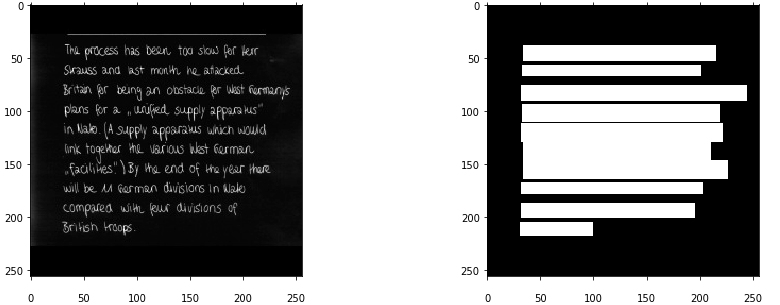
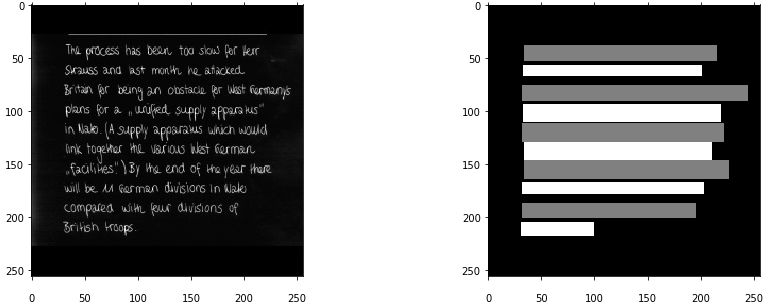
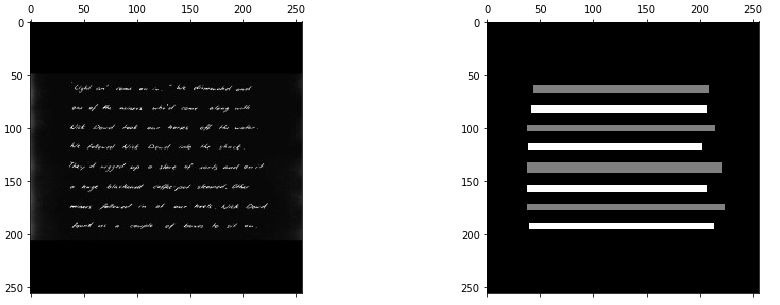
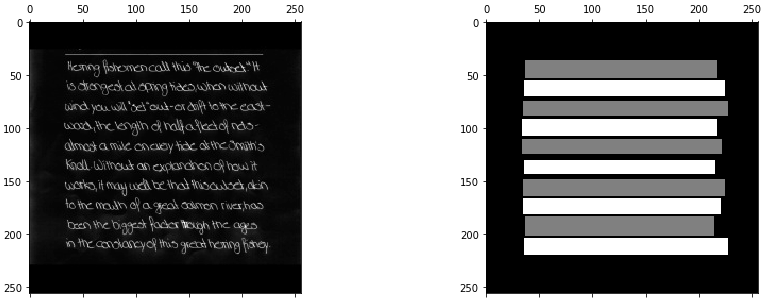
The objective in this experiment is to design a line detector. Given a paragraph image the model must be able to detect each line. What do you mean by detect? We will preprocess the paragraph dataset such that each pixel corresponds to either of the 3 classes i.e. 0 if it belongs to background, 1 if it belongs to odd numbered line and 2 if it belongs to even numbered line. Wait, why do you need 3 classes, when 2 are sufficient? The image below explains why we need 3 classes instead of 2?
With 2 classes : 0 for background and 1 for pixels on line.
With 3 classes : 0 for background, 1 for odd numbered-line and 2 for even numbered-line.
Here is how our dataset for line detection will look like after preprocessing.
Here is a sample after apply data augmentation.
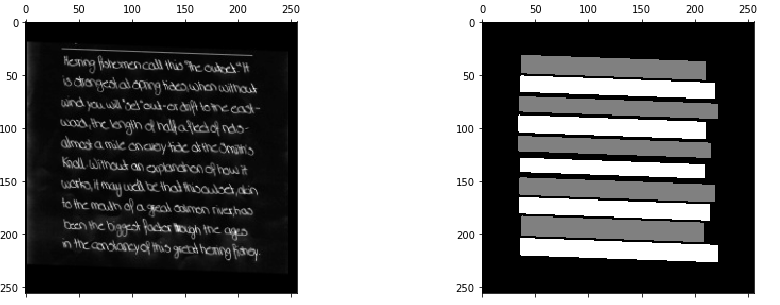
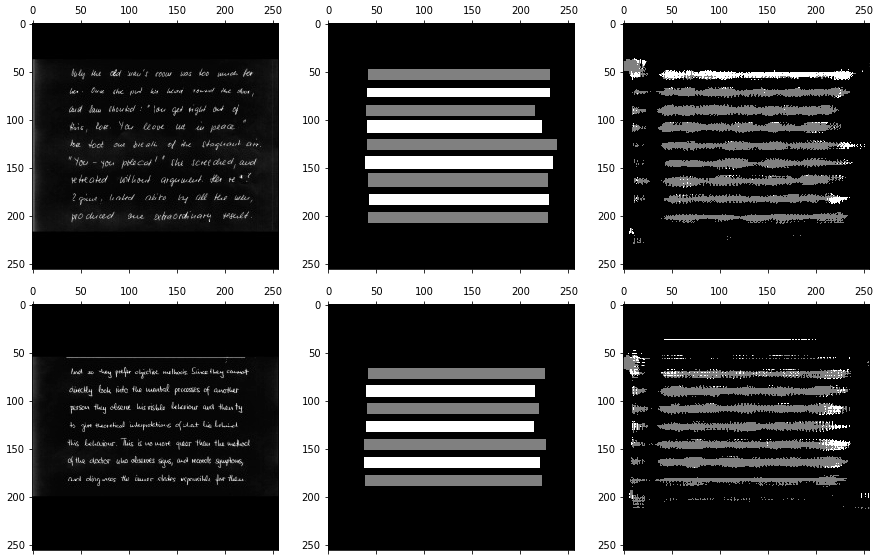
Now that we have dataset, images with paragraph of size (256, 256) and ground truths of size (256, 256, 3) we use full convolution neural networks to give output of size (256, 256, 3) for an input of (256, 256). We use 3 architectures, lenet-FCN (converted to FCNN), resnet-FCN and custom-FCN.
Results are bit embarassing.
- Lenet-FCN
- Resnet-FCN
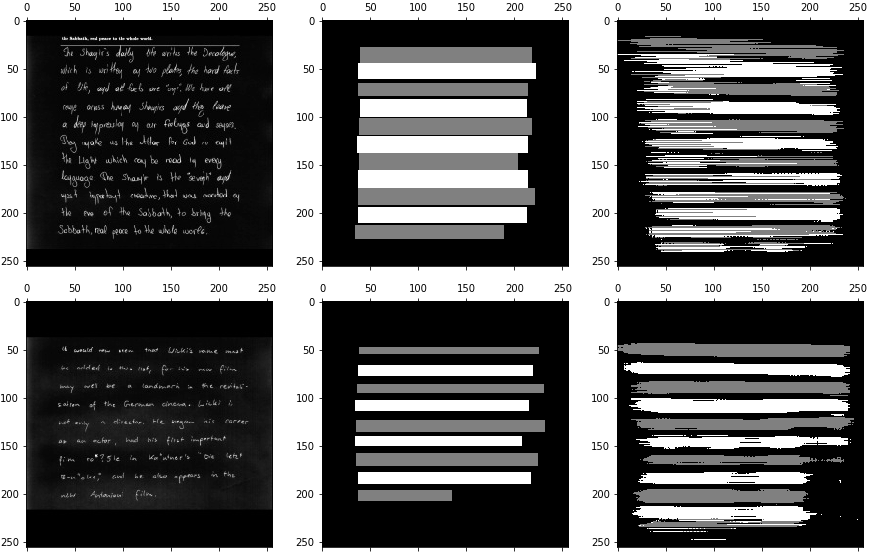
- Custom-FCN
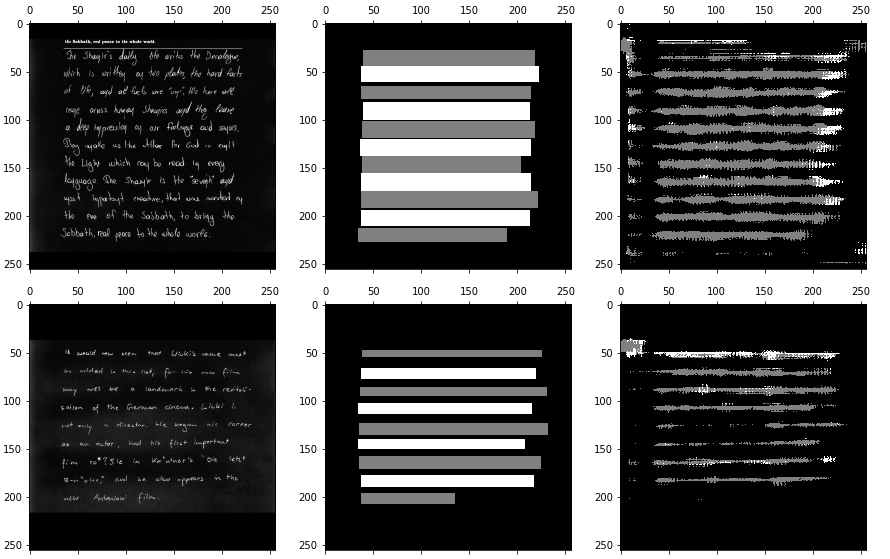
Learnings
- Investigate as to why model is not performing well in segmenting. Having a good line segmentor is critical for our OCR pipeline.
Experiment-4
Finally, all pieces from above experiments come together. To recap, we have a Line Predictor Model from experiment-2 which takes in input images of lines and predicts the characters in the line. And we have a Line Detector Model from experiment-3 which segments paragraphs into line regions.
Do you see the whole picture coming together? No?
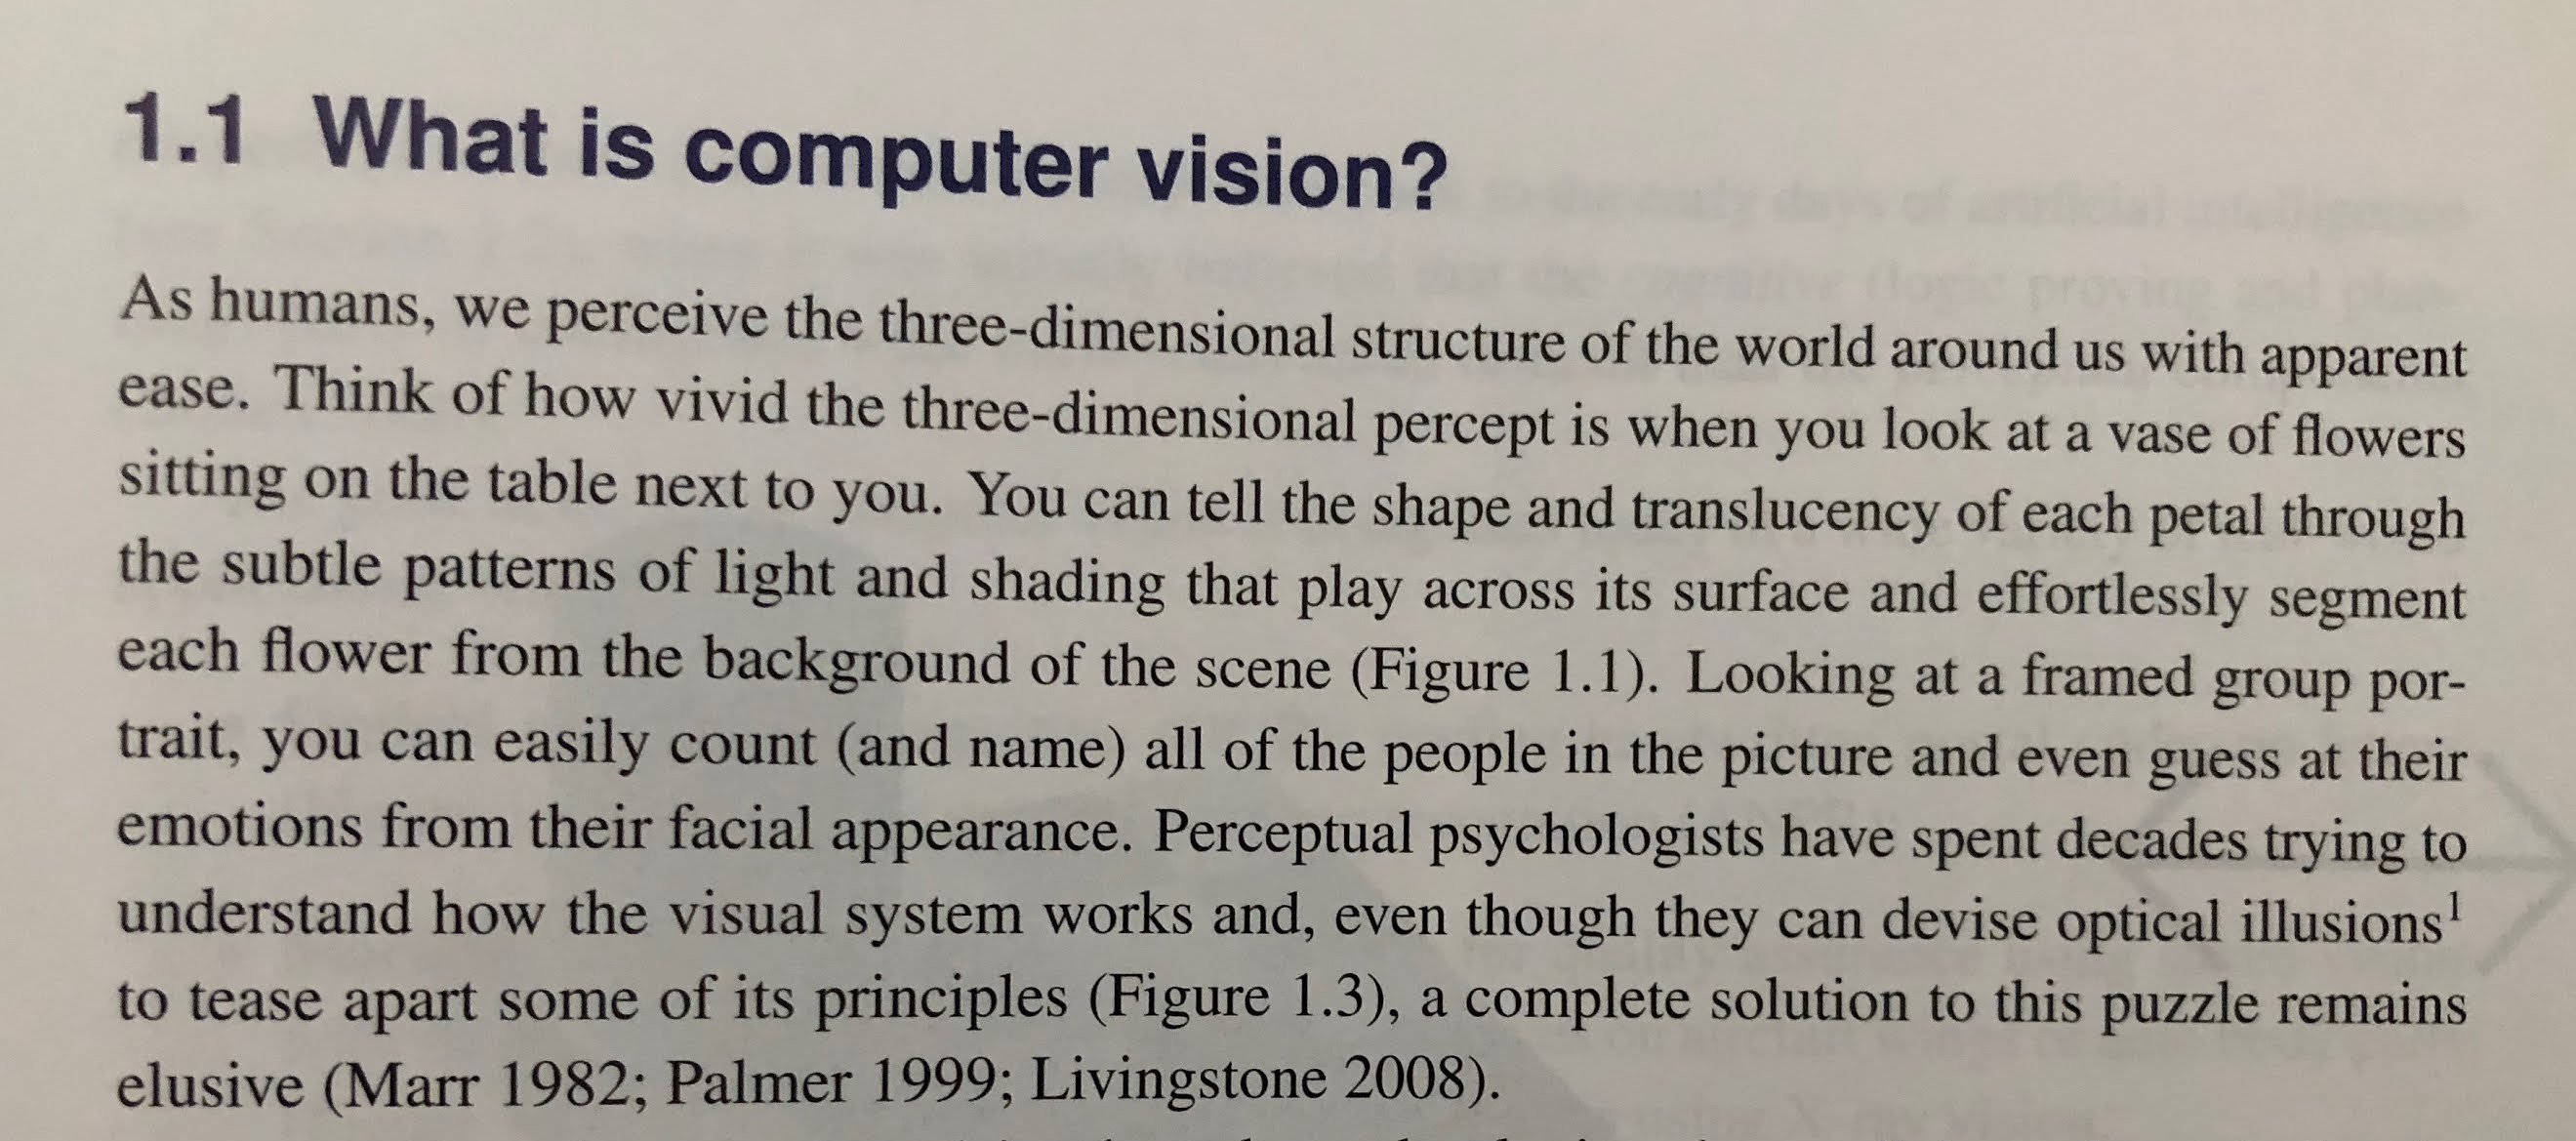
- Given an image like the one above, we want a model that returns all the text in the image.
- First step, we would use Line Detector Model. This model will segment image into lines.
- We will extract crops of the image corresponding to the line regions obtained from above line and pass it to Line Predictor Model which will predict what characters are present in the line region.
- Sure enough if both the models are well trained, we will get excellent results!
Experiment-5
Now that we have full end-to-end model, we can run the same model on a web server or create an android app.
Happy Learning!
Further Reading
Spring 2019 Full Stack Deep Learning Bootcamp
Creating a Modern OCR Pipeline Using Computer Vision and Deep Learning
Augmented camera previews for the Dropbox Android document scanner
What’s so hard about PDF text extraction?
Footnotes and Credits
NOTE
Questions, comments, other feedback? E-mail the author